π Business Hours (Pacific Time)
Monday - Friday: 10 AM to 3 PM
Saturday - Sunday: Closed
Closed on holidays.
ππ½ The best way to contact us is via our Support Form below:
π Business Hours (Pacific Time)
Monday - Friday: 10 AM to 3 PM
Saturday - Sunday: Closed
Closed on holidays.
ππ½ The best way to contact us is via our Support Form below:
The Kubota DASHBOARD is a Photoshop extension that organizes, searches, launches, and – by golly, it just makes Photoshop faster and more fun! It works with ANY action in Photoshop and all of the famous Kubota actions, borders, and textures. It also gives your own actions super powers, like one-step undo and paintability! The best way to fall in love with your DASHBOARD is to try it!
The DASHBOARD:
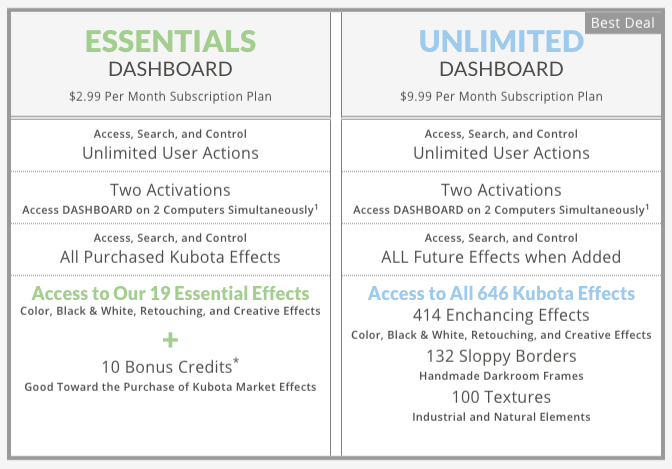
The Kubota DASHBOARD for Photoshop requires a monthly subscription, with plans starting at $2.99/mo.
All new subscribers receive a free 7-day trial to the Unlimited plan where you can access every effect we make - over 600 Kubota actions, borders, and textures prior to the start of your subscription.
Q: Do you offer discounts for annual subscribers?
A: Yes! We are now making annual subscriptions available with a discount! Please contact us to convert your monthly subscription to an annual plan and save 10% on Essentials, and 20% on Unlimited plans.
Q: Why a subscription?
A: Software is extremely expensive to develop and maintain. We also maintain a server to connect our product to the internet and manage customers. We simply could not offer our products without and ongoing support revenue.
Q: Do I have to have a DASHBOARD subscription to use your effects?
A: No, you can purchase individual effects as Photoshop actions (.atn files). Click here for more info on purchasing individual effects.
Included with your Essentials subscription is access to 19 of our most popular effects. For access to ALL our beautiful effects and workflow time-saving tools, subscribe to the Unlimited plan.
This article covers starting a trial subscription, downloading the DASHBOARD, installing it, and having fun with it!
1. Start a trial subscription.
2. Download the DASHBOARD installer.
3. Install the DASHBOARD.
4. Open the DASHBOARD in Photoshop.
5. Play with the DASHBOARD!
To start a subscription:
Requirements:
Video:
To download the DASHBOARD 5 installer file:
The installer file typically downloads into the Downloads folder.
π₯οΈ π To install DASHBOARD 5 on a MAC: NOTE: If you are using a Mac with the M1/M2/M3 processor, follow these instructions instead.
πͺ To install DASHBOARD 5 in WINDOWS:
If the DASHBOARD doesn't automatically open in Photoshop, go to Window > Extensions > Kubota Market DASHBOARD.
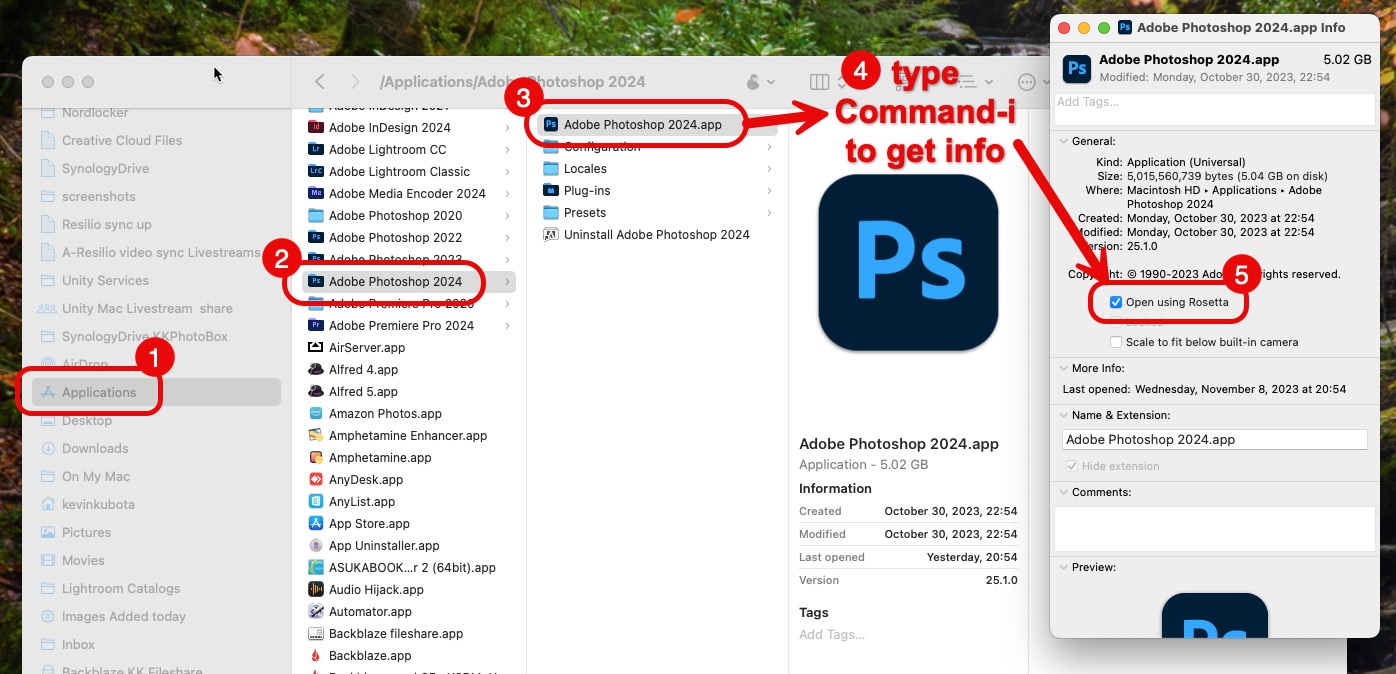
From Photoshop v.22.3 or later, extensions are not supported for Mac computers using the M1/M2/M3 processor, and the Extensions menu is not visible by default. However, the Kubota Market DASHBOARD can be used while running Photoshop 22.3 or later in Rosetta emulation mode, which re-enables the Extensions menu. Most users will not notice any significant difference when running in Rosetta mode.
Install the DASHBOARD normally, following these steps:
Set up Photoshop to "Open using Rosetta" by default.
π₯ Watch a video of the process here:
You can easily switch back and forth between using Rosetta mode and Native mode by checking/unchecking that box as above. Just make sure to quit Photoshop before changing modes, then restart it.
The DASHBOARD is loaded with our fantastic tools and effects, but you can also use the quick search, instant undo, and organization features of the DASHBOARD on any and all actions in your Photoshop action palette!
This video shows how easy it is:
If you can't log in to your DASHBOARD within Photoshop, first make sure your account is in good standing by logging in to your online account here.
If you can't log in because your email or password no longer works, you may either have an expired account or are trying to log in with a different email or password than what you signed up with.
1. Your account may have been closed because the subscription lapsed and after repeated notices to update it, it was not reinstated. You can start a new subscription by following these instructions.
2. If your email or password is not working, and you definitely have an active subscription, then contact us with your full name and possible email addresses and we can look you up and reset your password, if needed.
If you are able to log in online, and your subscription status looks normal, then let's check further:
βIs your DASHBOARD appearing in Photoshop, but the screen is blank? You may need to re-install your DASHBOARD.
βIs your DASHBOARD NOT appearing in Photoshop at all? You may have recently updated your computer to a Mac with M1 processor and need to run Photoshop in Rosetta mode. Click here for instructions.
βAre you getting a message when you try to log in that says, "Activations exceeded". Contact us to reset your activations.
βIf you are having a different issue, Contact us and we'll help.
Are you getting a message when you try to log in to your DASHBOARD that says, "Activations exceeded"? This happens when you install the DASHBOARD on more than 2 computers, OR if you upgrade your computer and did not deactivate the old one first.
Contact us to reset your activations.
That message appears when the link between Photoshop and Dashboard breaks due to a Photoshop or operating system update. Simply re-installing your DASHBOARD usually solves this issue. Note that you do not need to uninstall Photoshop.
To relink Photoshop and DASHBOARD:
If your DASHBOARD Installer stops and you get a message that it is from an unidentified developer, preventing you from continuing, you can manually allow the installation.
From your APPLE π menu at the top left of your screen, select “System Settings”.
Find the “Privacy & Security” option, and click on that.
You should see a panel on the right and scroll until you see the notice about the "Kubota Market Installer” and click “Open Anyway”.
You’ll be asked for your password, and then another confirmation. Do both and the DASHBOARD installer should now open up, ready to go.
Is your Photoshop's Home Screen enabled? If so, the DASHBOARD may be hiding behind it.
To disable Photoshop's Home Screen:
Workspace changes will take effect the next time you open Photoshop.
To uninstall DASHBOARD 5:
We accept major credit cards: MasterCard, Visa, American Express and Discover. We also use Apple Pay and Google Pay and several other bank direct options for non-US customers.
You can update the credit card used for your subscription by logging in to your account here.
1. After you log in, click on "Manage Subscription":
2. Then Click on "Update" under the Billing information:
You can restart your subscription as long as your account is still in our system.
1. Login to your account here.
2. Click on "Manage Subscription"
3. Click on "Start Subscription"
4. Then follow these instructions to start a new plan.
We are sad that you aren't finding your DASHBOARD valuable, but understand that sometimes we just need to let go :-)
You can cancel your subscription by logging in to your account here.
1. After you login, click on "Manage Subscription":
2. Then Click on "Cancel Subscription":
To update your email or password:
NOTE: RESETTING a forgotten password must be done manually by our staff if you cannot remember your password. Contact us and we'll reset it for you.
To reset your password: Contact Customer Support for assistance. It can only be reset manually by our staff. We cannot retrieve an old password as we do not have access to stored passwords. We can only reset to a new password.
See this section for updating your credit card.
To change from Essentials to Unlimited or vice versa:
To load effects after changing your subscription plan:
All of our effects can be purchased individually, or as themed packages, separately from our DASHBOARD. They are installed as Photoshop Actions (.atn files). These actions can be used traditionally from the Photoshop actions palette, or Supercharged with our DASHBOARD!
Can I still purchase effects if I don't have a Dashboard subscription?
Yes, you can purchase effects individually and in money-saving packages without a Dashboard subscription from the Kubota Image Tools website. Any effects you purchase can be used with, searched, and controlled via our DASHBOARD if you decide to subscribe in the future.
Lightroom has an HDR feature that creates HDR images from any photo. When you open this adjusted photo in to Photoshop - using the Edit in Adobe Photoshop menu, it is opened in Photoshop in 32-bit mode, which is incompatible with some actions and effects. You eventually need to convert images down to 8-bit anyway to be able to print or save .JPG files:
This video will explain how to convert the resulting 32-bit HDR image in Photoshop to 8-bits so that you can apply any of our actions and effects to it:
NOTE: Recent Photoshop updates have disabled our ability to export DASHBOARD effects to the actions palette. If you cannot export your effects as in Part 1 of these instructions, this is why. We have a workaround for some users. Contact us for more info.
Batch processing is an essential way to speed up your workflow when you want to make the same adjustments on multiple images automatically. Any Kubota actions can be used in a batch if they don’t have any steps that require you to interact with them (like adjusting the Gaussian blur or changing the size of the selection, etc.).
Here's a video demonstrating the steps:
DASHBOARD effects need to be converted to actions before they can be used in a batch. Here's how:
To use an action in a batch process, and for it to run unattended, we need to add a few automation steps:
Watch the video above for specifics on how to do these.
These are examples of the settings to use in the batch dialog box:
Install the Kubota Sloppy Borders action, scripts and templates files to successfully run and apply the borders.
Watch the video below, or follow the written steps:
Follow one of the methods below.
Method 1:
Method 2:
Kubota Sloppy Border Single Setup
Sloppy Batch Script setup
Sloppy Batch Script setup 4x6
Your Kubota Sloppy Borders are the original, hand-crafted borders made from actual filed out negative carriers – the original and authentic way! Most digital facsimiles available on the market today do not compare.
Our Sloppy borders are available as a stand-along Photoshop action set, OR they come included in your DASHBOARD Unlimited subscription, which includes every effect, border, and texture we make for your creative work.
Running them is slightly different, depending on which version you have. This video shows you the basics of each, and also how to colorize the border if desired:
Profiles and Presets are slightly different in Lightroom. We offer both options with our effects.
Profiles appear in a different location than your presets. Traditional Presets make use of Lightroom’s adjustment tools to create the look. Profiles can be made using adjustment tools, but they can also take advantage of advanced color manipulation only available in separate color editing software, giving you looks that Lightroom just isn’t capable of creating on its own. Profiles are infinitely more powerful.
You can apply a Profile AND still apply a Preset, or presets, on top of it to fine-tune the look. The benefit of a Profile is that it does not mess with any of your Lightroom slider adjustments, so you are free to set those as you see fit independently from the Profile. Applying any Preset, on the other hand, could potentially change your original slider adjustments, depending on how it is designed.
Many artists like to adjust their images first for optimum exposure, color, and tone, and then drop a beautiful Profile on top of it to make it special.
Before attempting to install your Presets or Profiles, make sure they are downloaded and un-zipped in a convenient location on your computer.
In Lightroom Classic, the easiest way to install Presets or Profiles is via the Import Presets option. You can install either Presets or Profiles through the same menu:
Presets and Profiles will automatically be installed in their correct locations and grouped by their collection name.
In Lightroom (cloud), install Presets via the Import Presets option.
In Lightroom (cloud), install Profiles via the Import Profiles option.
Follow one of the methods below.
Method 1:
Method 2: