Kubota Actions Support Center
Support resources for Kubota Actions and LUTs for Photoshop®. Contact Customer Support if you have additional questions.
How will I get my purchased products?
A message with a product download link will be sent to your email inbox. Download and save each purchased product to your computer and follow the installation steps below.
How do I get my lost actions back?
If you lost your Kubota effects due to a computer or software upgrade, contact Customer Support and provide a purchase receipt or the email used to purchase the effects to receive a product download link.
Install the Kubota Artistic Tools action and presets files to successfully run and apply the effects.
Photoshop CS2 - CC2019:
Method 1:
Method 2:
Install the Kubota Production Tools actions and presets files to successfully run and apply the effects.
Photoshop CS2 - CC2019:
Method 1:
Method 2:
Now you can place the logo on future images by simply running any of the three logo placer Actions.
Bonus Info: You can record as many logos as you want into this area. Then select which one you want to run by turning the check mark to the left of the Action Open step on or off. Just be sure to only have one step on at a time.
Install the Kubota Artistic Tools InstaLooks action and presets files to successfully run and apply the effects.
Method 1:
Method 2:
Batch processing is an essential way to speed up your workflow when you want to make the same adjustments on multiple images. Any Kubota actions can be used in a batch if they don’t have any steps that require you to interact with them (like adjusting the gaussian blur or changing the size of the selection, etc.).
Before running the logo placer effect, you must first record the location of your logo.
Bonus Info: You can record as many logos as you want into this area. Then select which one you want to run by turning the check mark to the left of the Action Open step on or off. Just be sure to only have one step on at a time.
The Eyes and Teeth effect creates facial enhancement layers masks for you. Just step through each layer, paint where desired on the corresponding layer mask, and then adjust the opacity of the layer as needed.
Certain actions provide additional instructions in the form of a dialog box. Once you become familiar with how each effect you use works, you may want to hide the instructions, allowing for an even faster workflow.
Install the Kubota Sloppy Borders action, scripts and templates files to successfully run and apply the borders.
Method 1:
Method 2:
Kubota Sloppy Border Single Setup
Install the Kubota Textures action, brushes & scripts, and texture files to successfully run and apply the textures.
Method 1:
Method 2:
Get the most from your textures by following these few simple steps. Change the Texture Mode:
Install AutoAlbum action files to successfully run and apply the templates.
Method 1:
Method 2:
Template sizes available:
Square [ S ]
Square Panorama [ SP ]
Rectangle Vertical [ RV ]
Every template name corresponds to the name of an Action. The name tells you the type of page, how many Horizontal images, and how many Vertical images are on the page.
Download the template library reference guide.
Customize some of the features about the look of your album layout by changing the Kubota AutoAlbum default preferences found in Photoshop's Actions palette.
To customize the AutoAlbum preferences:
To customize the Keyline thickness and color:
To customize the Color Overlay and Opacity:
To customize the Keyline with Color Overlay and Opacity:
To customize the Background color:
To customize the album page Resolution:
Before designing an album, your images should be:
To create your album design:
To edit an image already placed in a layout:
To replace an image already placed in a layout:
How will I get my purchased products?
A message with a product download link will be sent to your email inbox. Download and save each purchased product to your computer and follow the installation steps below.
How do I get my lost actions back?
If you lost your Kubota effects due to a computer or software upgrade, contact Customer Support and provide a purchase receipt or the email used to purchase the effects to receive a product download link.
Install the Kubota Artistic Tools action and presets files to successfully run and apply the effects.
STEP 1 - Extract Files:
- Open a Finder or File Explorer window
- Navigate to the downloaded Kubota Artistic Tools XXXX.zip likely found in your Downloads folder
- Unzip/Extract if needed
Included files:
-
• Kubota Artistic Tools XXXX.atn
-
• Kubota Artistic Tools Installation Instructions.pdf
-
• Kubota Artistic Tools XXXX in Detail.pdf
-
• Presets Folder: Includes folders for Kubota Brushes, Kubota Custom Shapes, Kubota Scripts, Kubota Tools
- Keep your Finder or File Explorer window open and continue to STEP 2
STEP 2 - Load the Presets Files into Photoshop
Photoshop CC2020 - CC2022:- Close Photoshop
- Open a second Finder or File Explorer window
-
• Mac: Applications > Adobe Photoshop (your version) > Presets
-
• Windows: C Drive > Program Files or Program Files (x86) > Adobe > Adobe Photoshop (your version) > Presets
- Place both Finder or File Explorer windows side-by-side
- Move these Kubota presets folders into their corresponding Photoshop’s Presets folders
-
• Select the Kubota Brushes folder and move into Photoshop > Presets > Brushes folder
-
• Select the Kubota Scripts folder and move into Photoshop > Presets > Scripts folder
-
• Select the Kubota Tools folder and move into Photoshop > Presets > Tools folder
- Open Photoshop
- Go to Window > Shapes
- Click on the top right menu icon of the Shapes palette
- Select Import Shapes from the menu list
- Navigate to and open the Kubota Artistic Tools XXXXX folder
- Open the Presets folder
- Open the Kubota Custom Shapes folder
- Select the Kubota starbursts.csh file
- Click on the Open/Load button
- Your presets files are now loaded into Photoshop.
- Keep your Finder or File Explorer window open and continue to STEP 3
Photoshop CS2 - CC2019:
- Close Photoshop
- Open a second Finder or File Explorer window
- Navigate to and open Photoshop’s Presets folder
-
• Mac: Applications > Adobe Photoshop (your version) > Presets
-
• Windows: C Drive > Program Files or Program Files (x86) > Adobe > Adobe Photoshop (your version) > Presets
- Place both Finder or File Explorer windows side-by-side
- Move these Kubota presets folders into their corresponding Photoshop’s Presets folders
-
• Select the Kubota Brushes folder and move into Photoshop > Presets > Brushes folder
-
• Select the Kubota Custom Shapes folder and move into Photoshop > Presets > Custom Shapes folder
-
• Select the Kubota Scripts folder and move into Photoshop > Presets > Scripts folder
-
• Select the Kubota Tools folder and move into Photoshop > Presets > Tools folder
- Keep your Finder or File Explorer window open and continue to STEP 3
STEP 3 - Load the Action File into Photoshop
Follow one of the methods below.Method 1:
- Double-click on the Kubota Artistic Tools XXXX.atn file
- Photoshop will open
- Go to Window > Actions to open the Actions palette
- The action file is now loaded into Photoshop's Actions palette and can be found at the bottom of the list
- You are done and ready to edit.
Method 2:
- Open Photoshop
- Go to Window > Actions to open the Actions palette
- Click on the top right menu icon
- Select Load Actions... from the menu list
- Navigate to and open the Kubota Artistic Tools XXXX pak folder and select file Kubota Artistic Tools XXXX.atn
- Click on the Open/Load button.
- The action file is now loaded into Photoshop's Actions palette and can be found at the bottom of the list
- You are done and ready to edit.
NOTE - Loading more than one Kubota Artistic Bundle?
If you are installing more than one of the Kubota action bundles listed below, you only need to follow the preset installation steps once as all of these use the same presets.-
• Kubota Artistic Tools V1
-
• Kubota Artistic Tools V2
-
• Kubota Artistic Tools V3
-
• Kubota Artistic Tools V4
-
• Kubota Production Tools 2
-
• Kevin Kubota Artist Series
-
• Kubota Artistic Tools Viva La Vintage
-
• Kubota Michael Corsentino Artist Series
-
• Kubota Artistic Tools Pow Wow
-
• Kubota Tamara Lackey Artist Series
-
• Kubota Creative Lensbaby Tools Starter Pak
Install the Kubota Production Tools actions and presets files to successfully run and apply the effects.
STEP 1 - Extract Files:
- Open a Finder or File Explorer window
- Navigate to the downloaded Kubota Production Tools V2.zip likely found in your Downloads folder
- Unzip/Extract if needed
Included files:
-
• Kubota Production Tools V2.atn
-
• Kubota Production Tools Installation Instructions.pdf
-
• Kubota Production Tools V2 in Detail.pdf
-
• Presets Folder: Includes folders for Kubota Brushes, Kubota Custom Shapes, Kubota Scripts, Kubota Tools
- Keep your Finder or File Explorer window open and continue to STEP 2
STEP 2 - Load the Presets Files into Photoshop
Photoshop CC2020 - CC2022:- Close Photoshop
- Open a second Finder or File Explorer window
-
• Mac: Applications > Adobe Photoshop (your version) > Presets
-
• Windows: C Drive > Program Files or Program Files (x86) > Adobe > Adobe Photoshop (your version) > Presets
- Place both Finder or File Explorer windows side-by-side
- Move these Kubota presets folders into their corresponding Photoshop’s Presets folders
-
• Select the Kubota Brushes folder and move into Photoshop > Presets > Brushes folder
-
• Select the Kubota Scripts folder and move into Photoshop > Presets > Scripts folder
-
• Select the Kubota Tools folder and move into Photoshop > Presets > Tools folder
- Open Photoshop
- Go to Window > Shapes
- Click on the top right menu icon of the Shapes palette
- Select Import Shapes from the menu list
- Navigate to and open the Kubota Production Tools V2 folder
- Open the Presets folder
- Open the Kubota Custom Shapes folder
- Select the Kubota starbursts.csh file
- Click on the Open/Load button
- Your presets files are now loaded into Photoshop.
- Keep your Finder or File Explorer window open and continue to STEP 3
Photoshop CS2 - CC2019:
- Close Photoshop
- Open a second Finder or File Explorer window
- Navigate to and open Photoshop’s Presets folder
-
• Mac: Applications > Adobe Photoshop (your version) > Presets
-
• Windows: C Drive > Program Files or Program Files (x86) > Adobe > Adobe Photoshop (your version) > Presets
- Place both Finder or File Explorer windows side-by-side
- Move these Kubota presets folders into their corresponding Photoshop’s Presets folders
-
• Select the Kubota Brushes folder and move into Photoshop > Presets > Brushes folder
-
• Select the Kubota Custom Shapes folder and move into Photoshop > Presets > Custom Shapes folder
-
• Select the Kubota Scripts folder and move into Photoshop > Presets > Scripts folder
-
• Select the Kubota Tools folder and move into Photoshop > Presets > Tools folder
- Keep your Finder or File Explorer window open and continue to STEP 3
STEP 3 - Load the Action Files into Photoshop
Follow one of the methods below.Method 1:
- Double-click on the Kubota Production Tools V2.atn file
- Photoshop will open
- Double-click on the Kubota set-up Actions 2.atn file
- Go to Photoshop
- Go to Window > Actions to open the Actions palette
- The action files are now loaded into Photoshop's Actions palette and can be found at the bottom of the list
- Continue to STEP 4
Method 2:
- Open Photoshop
- Go to Window > Actions to open the Actions palette
- Click on the top right menu icon
- Select Load Actions... from the menu list
- Navigate to and open the Kubota Production Tools V2 pak folder and select file Kubota Production Tools V2.atn
- Click on the Open/Load button.
- Click on the top right menu icon
- Select Load Actions... from the menu list
- Navigate to and open the Kubota Production Tools V2 pak folder and select file Kubota set-up Actions 2.atn
- The action files are now loaded into Photoshop's Actions palette and can be found at the bottom of the list
- Continue to STEP 4
STEP 4 - Set Up Your Logo:
Before running the logo placer effect, you must first record the location of your logo.- Open Photoshop.
- Go to Window > Actions to make the Actions palette visible.
- Locate and expand the set Kubota set-up Actions
- Select Open Logo.
- Click on the Record icon at the bottom of the Actions palette.
- Go to File > Open.
- Navigate to and select your logo file.
- Click on the Open button.
- Click on the Stop icon at the bottom of the Actions palette.
- Close the logo file.
Now you can place the logo on future images by simply running any of the three logo placer Actions.
Bonus Info: You can record as many logos as you want into this area. Then select which one you want to run by turning the check mark to the left of the Action Open step on or off. Just be sure to only have one step on at a time.
NOTE - Loading more than one Kubota Artistic Bundle?
If you are installing more than one of the Kubota action bundles listed below, you only need to follow the preset installation steps once as all of these use the same presets.-
• Kubota Artistic Tools V1
-
• Kubota Artistic Tools V2
-
• Kubota Artistic Tools V3
-
• Kubota Artistic Tools V4
-
• Kubota Production Tools 2
-
• Kevin Kubota Artist Series
-
• Kubota Artistic Tools Viva La Vintage
-
• Kubota Michael Corsentino Artist Series
-
• Kubota Artistic Tools Pow Wow
-
• Kubota Tamara Lackey Artist Series
-
• Kubota Creative Lensbaby Tools Starter Pak
Install the Kubota Artistic Tools InstaLooks action and presets files to successfully run and apply the effects.
STEP 1 - Extract Files:
- Open a Finder or File Explorer window
- Navigate to the downloaded Kubota Artistic Tools InstaLooks.zip likely found in your Downloads folder
- Unzip/Extract if needed
Included files:
-
• Kubota Artistic Tools InstaLooks.atn
-
• Kubota Artistic Tools Installation Instructions.pdf
-
• Kubota Artistic Tools InstaLooks in Detail.pdf
-
• Kubota InstaScripts Folder
-
• Kubota InstaTextures Folder
- Keep your Finder or File Explorer window open and continue to STEP 2
STEP 2 - Load the Presets Files into Photoshop
Photoshop CS2 - CC2022:- Close Photoshop
- Open a second Finder or File Explorer window
- Navigate to and open Photoshop’s Presets folder
-
• Mac: Applications > Adobe Photoshop (your version) > Presets
-
• Windows: C Drive > Program Files or Program Files (x86) > Adobe > Adobe Photoshop (your version) > Presets
- Place both Finder or File Explorer windows side-by-side
- Move these Kubota presets folders into their corresponding Photoshop’s Presets folders
-
• Select the Kubota InstaScripts folder and move into Photoshop > Presets > Scriptsfolder
-
• Select the Kubota InstaTextures folder and move into the Photoshop folder
- Keep your Finder or File Explorer window open and continue to STEP 3
STEP 3 - Load the Action File into Photoshop
Follow one of the methods below.Method 1:
- Double-click on the Kubota Artistic Tools InstaLooks.atn file
- Photoshop will open
- Go to Window > Actions to open the Actions palette
- The action file is now loaded into Photoshop's Actions palette and can be found at the bottom of the list
- Continue to STEP 4
Method 2:
- Open Photoshop
- Go to Window > Actions to open the Actions palette
- Click on the top right menu icon
- Select Load Actions... from the menu list
- Navigate to and open the Kubota Artistic Tools InstaLooks folder and select file Kubota Artistic Tools InstaLooks.atn
- Click on the Open/Load button.
- The action file is now loaded into Photoshop's Actions palette and can be found at the bottom of the list
- Continue to STEP 4
STEP 4 - Setting up Textures
- Open an image.
- Open the Kubota InstaLooks set by clicking on the triangle to the left of the action set.
- Open the SunKiss set by clicking on the triangle to the left of the action name.
- Select and double click on the Place step. This will start the recording process.
- On the next window, navigate to Kubota InstaTextures within the Photoshop folder.
-
• Mac: Applications > Adobe Photoshop (your version) > Kubota InstaTextures
-
• Windows: C Drive > Program Files > Adobe > Adobe Photoshop (your version) > Kubota InstaTextures
- Select the corresponding texture name and click Place. This will place a small texture layer over your image.
- Click Return/Enter to place the texture and stop recording. (You may delete that texture layer off of your image).
- Follow the same Setting Up Textures steps above to set up the following actions with their corresponding textures:
-
• SunKiss ............................................... SunKissTexture.jpg
-
• Timeless ............................................. TimelessTexture.jpg
-
• Custard Cream ................................ CustardCreamTexture.jpg
-
• View Find Her Tinted ...................ViewFindHerTexture.jpg
-
• Baby Soft ............................................ BabySoftTexture.png
-
• Vitalux Premo .................................. VitaluxPremoTexture.jpg
-
• Old Leather ....................................... OldTextures.jpg
-
• Old Scratched Film ....................... OldTextures.jpg
- You are done and ready to edit.
Batch processing is an essential way to speed up your workflow when you want to make the same adjustments on multiple images. Any Kubota actions can be used in a batch if they don’t have any steps that require you to interact with them (like adjusting the gaussian blur or changing the size of the selection, etc.).
Set Up
- Open your Adobe® Photoshop® application.
- Go to Window > Actions to open the Actions palette.
- Click on the top right corner of the Actions palette to view the menu options and select New Set...
- Name this new set My Batching Actions or another name of your choice.
- Select the action you want to batch with.
- Click on the top right corner of the Actions palette to view the menu options and select Duplicate.
- Select the duplicated action and drag it underneath your My Batching Actions set.
To avoid losing changes made to My Batching Actions set in the event of an unexpected computer or Photoshop shutdown, we recommend saving after each edit session. - Select the My Batching Actions set.
- Click on the top right corner of the Actions palette to view the menu options and select Save Actions... and choose a save to location.
- Select the action you want to batch within My Batching Actions set and open the steps by clicking on the triangle to the left of the action name.
- Select the last step within that action.
- Click on the top right corner of the Actions palette to view the menu options and select Insert Menu Item.
- Go to Layer > Flatten Image. Click Ok.
- Open any image.
- Flatten image - Layer > Flatten Image
- Click the Record button and go to File > Save As.
Select JPG as file format and Desktop for location in the next window. - Choose the Image Quality you prefer and Baseline Optimized.
- Click Ok and stop recording.
- Close the image without saving any changes.
- Save My Batching Actions set.
Run Batch
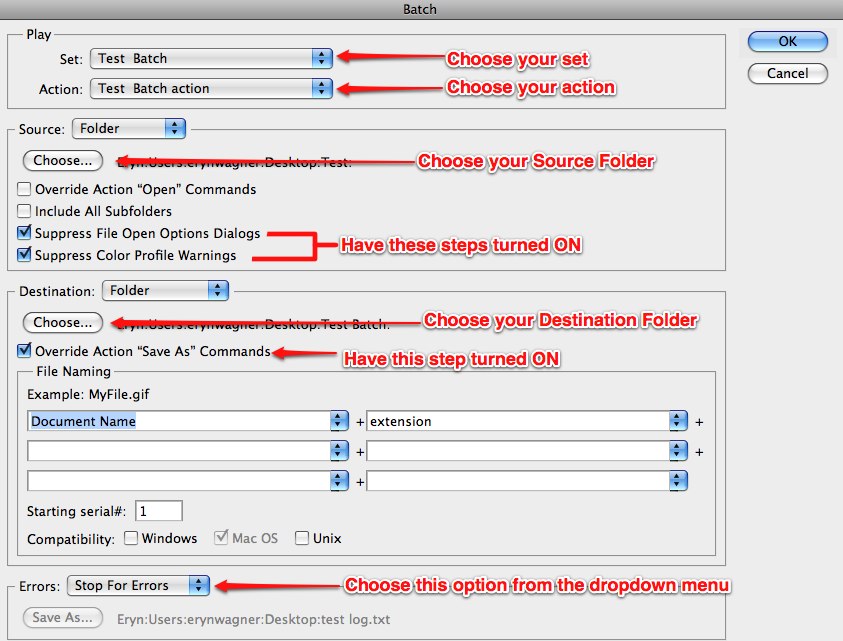
- Go to File > Automate > Batch.
- Select options as shown on the graphic below.
- Click OK to proceed.
Before running the logo placer effect, you must first record the location of your logo.
Set Up Your Logo:
- Open Photoshop.
- Go to Window > Actions to make the Actions palette visible.
- Locate and expand the set Kubota set-up Actions
- Select Open Logo.
- Click on the Record icon at the bottom of the Actions palette.
- Go to File > Open.
- Navigate to and select your logo file.
- Click on the Open button.
- Click on the Stop icon at the bottom of the Actions palette.
- Close the logo file.
Bonus Info: You can record as many logos as you want into this area. Then select which one you want to run by turning the check mark to the left of the Action Open step on or off. Just be sure to only have one step on at a time.
The Eyes and Teeth effect creates facial enhancement layers masks for you. Just step through each layer, paint where desired on the corresponding layer mask, and then adjust the opacity of the layer as needed.
Make Enhacements:
- Open an image.
- Play the Eyes and Teeth Enhance action.
- Go to Window > Layers to open the layers palette.
- Select the eyes brighten layer mask.
- Adjust the opacity of the layer if needed.
- Start painting over the whites of the eyes to brighten them up.
- Select the teeth brighten layer mask.
- Start painting over the teeth to brighten them up.
- Adjust the opacity of the layer if needed.
- Select the Desaturate eyes and teeth layer mask.
- Start painting over the red from the eyes and ellow from teeth.
- Adjust the opacity of the layer if needed.
- Select the darken shadows layer mask in the EyeLiner darken set.
- Paint around the eye lashes, the outside of the iris, and the eye brows to deepen the darker areas
Set Up
- Play the Portrait setup step 1 action and follow the instructions to make a rough selection around the area of your image you want to retouch using the lasso tool.
- On the base image, use the healing brush to remove blemishes that you want eliminated.
- Play the Portrait setup step 2 action. A new group of layers will be created on your layers palette.
Make Adjustments on the Portrait setup step 2 Layers:
- Retouch layer: Use the healing brush to minimize wrinkles, dark circles, etc.. Adjust the opacity of that layer to fade the effect without removing them completely.
- Light skin powder layer: Use a soft-edged paint brush, sample skin color and paint areas to make them lighter.
Tip: to sample the skin color, Option > click for Mac and ALT > click for PC. It is best to continually resample skin so tones are smooth. - Dark skin powder layer: Use a soft-edged paint brush, sample skin color and paint areas to make them darker.
Tip: to sample the skin color, Option > click for Mac and ALT > click for PC. - Eye whites layer mask: Use a soft-edged paint brush, paint with white to whiten.
- Color iris layer mask: Use a soft-edged paint brush, paint with white to saturate color.
- Desaturate eyes & teeth layer mask: Use a soft-edged paint brush, paint with white to clean bloodshot eyes and teeth stains.
- Eyeliner layer: Use a soft-edged paint brush, paint with black at about 25-50% opacity to burn dark areas of eyelashes and rim of iris.
Res Up or Res Down:
- Crop your image first to the correct proportions without changing the resolution.
- Go to Image > Image Size.
- Check the Resample Image and Constrain Proportions options.
- Enter your desired height or width (the other dimension will automatically change to match).
- Enter your desired resolution.
Make a note of the resulting pixel dimensions at the top of the window. It will be the larger size to the left of the numbers in parentheses. This is you target image size. - Close the dialog box WITHOUT clicking OK.
- set your info bar to show document size. This will help you to keep track of the file size as it grows.
- Play the desired res up action until you have gone one step past your target size.
- Undo your last step back one size.
- Go to Image > Image.
- Check the Resample Image and Constrain Proportions options.
- Type in the needed width or height and resolution.
- Click on the OK button.
- Use the Res Up 5 or Res Up 10 effect to enlarge 110% five or ten times.
Certain actions provide additional instructions in the form of a dialog box. Once you become familiar with how each effect you use works, you may want to hide the instructions, allowing for an even faster workflow.
Show / Hide the Dialog box:
- Click on the Dialog Box icon next to the action name.
- Click OK.
Install the Kubota Sloppy Borders action, scripts and templates files to successfully run and apply the borders.
STEP 1 - Extract Files
- Open a Finder or File Explorer window
- Navigate to the downloaded Kubota Sloppy Borders.zip likely found in your Downloads folder
- Unzip/Extract if needed
Included files:
-
• Kubota Sloppy Borders Vol 1.atn
-
• Kubota Sloppy Borders Installation Instructions.pdf
-
• Kubota Sloppy Borders in Detail.pdf
-
• Kubota Sloppy Border Scripts folder
-
• Templates Folder: Includes folders for Heavy, Medium, Thin
- Keep your Finder or File Explorer window open and continue to STEP 2
STEP 2 - Load the Scripts and Templates Files into Photoshop
- Close Photoshop
- Open a second Finder or File Explorer window
- Navigate to and open Photoshop’s Presets folder
-
• Mac: Applications > Adobe Photoshop (your version) > Presets
-
• Windows: C Drive > Program Files or Program Files (x86) > Adobe > Adobe Photoshop (your version) > Presets
- Place both Finder or File Explorer windows side-by-side
- Move these Kubota scripts and templates folders into their corresponding Photoshop’s folders
-
• Select the Kubota Sloppy Scripts folder and move into Photoshop > Presets > Scripts folder
-
• Select the Kubota Sloppy Borders Templates folder and move into Photoshop (your version)
- The scripts and templates files are now loaded into Photoshop
- Keep your Finder or File Explorer window open and continue to STEP 3
STEP 3 - Load the Action File into Photoshop
Follow one of the methods below.Method 1:
- Double-click on the action file Kubota Sloppy Borders Vol 1.atn
- Photoshop will open
- Go to Window > Actions to open the Actions palette
- The action file is now loaded into Photoshop's Actions palette and can be found at the bottom of the list
- Continue to STEP 4
Method 2:
- Open Photoshop
- Go to Window > Actions to open the Actions palette
- Click on the top right menu icon
- Select Load Actions... from the menu list
- Navigate to and open the Kubota Sloppy Borders folder
- Select the file Kubota Sloppy Borders Vol 1.atn
- Click on the Open/Load button.
- The action file is now loaded into Photoshop's Actions palette and can be found at the bottom of the list.
- Continue to STEP 4
STEP 4 - Kubota Sloppy Border Setup
- In Photoshop, go to Window > Actions
- Locate the Kubota Sloppy Borders Vol 1 folder
- Click on the triangle to the left of the folder name to expand and show its contents
Kubota Sloppy Border Single Setup
- Select (one-click) the Sloppy Sloppy Border Single Set Up action
- Click on the Play (triangle) icon at the bottom of the Actions palette
- Read the information on the pop-up window, then click Continue
- Follow the steps on the next pop-up window, then click Stop
- Click on the Record (circle) icon at the bottom of the Actions palette
- Go to File > Scripts > Sloppy Border Single
- On the next window, navigate to:
-
• Mac: Applications > Adobe® Photoshop® (your version) > Kubota Sloppy Borders Templates
-
• Windows:C Drive > Program Files > Adobe® > Adobe® Photoshop® your version) > Kubota Sloppy Borders
- Select any one the border files within the Kubota Sloppy Borders Templates folder, then click Open
- On the next window, confirm the border selection by clicking Continue
- Click on the Stop (square) icon at the bottom of the Actions palette to stop recording
- Select (one-click) the Sloppy Batch Script setup action
- Click on the Play (triangle) icon at the bottom of the Actions palette
- Read the information on the pop-up window, then click Continue
- Follow the steps on the next pop-up window, then click Stop
- Click on the Record (circle) icon at the bottom of the Actions palette
- Go to File > Scripts > Sloppy Batch
- On the next window, navigate to:
-
• Mac: Applications > Adobe® Photoshop® (your version) > Kubota Sloppy Borders Templates
-
• Windows: C Drive > Program Files > Adobe® > Adobe® Photoshop® your version) > Kubota Sloppy Borders
- Select any one the border files within the Kubota Sloppy Borders Templates folder, then click Open
- On the next window, confirm the border selection by clicking Continue
- Click on the Stop (square) icon at the bottom of the Actions palette to stop recording
- Select (one-click) the Sloppy Batch Script setup 4x6 action
- Click on the Play (triangle) icon at the bottom of the Actions palette
- Read the information on the pop-up window, then click Continue
- Follow the steps on the next pop-up window, then click Stop
- Click on the Record (circle) icon at the bottom of the Actions palette
- Go to File > Scripts > Sloppy Batch 4x6
- On the next window, navigate to:
-
• Mac: Applications > Adobe® Photoshop® (your version) > Kubota Sloppy Borders Templates
-
• Windows: C Drive > Program Files > Adobe® > Adobe® Photoshop® your version) > Kubota Sloppy Borders
- Select any one the border files within the Kubota Sloppy Borders Templates folder, then click Open
- On the next window, confirm the border selection by clicking Continue
- Click on the Stop (square) icon at the bottom of the Actions palette to stop recording
-
You are done and ready to edit.
Add a Sloppy Border - Single
- Open Photoshop
- Open an image you wish to enhance
- Go to Window > Actions
- Locate the Kubota Sloppy Borders Vol 1 folder
- Click on the triangle to the left of the folder name to expand and show its contents
- Select the Run Sloppy Border Single action
- Click on the Play (triangle) icon at the bottom of the Actions palette
- Read the instructions, then click on the Continue button
- Select a sloppy border from the list
- Click on the Open button
- Read instructions, then click on the Continue button
Add a Sloppy Border - Batch / Batch 4x6
- Open Photoshop
- Go to Window > Actions
- Locate the Kubota Sloppy Borders Vol 1 folder
- Click on the triangle to the left of the folder name to expand and show its contents
- Select the Run Sloppy Batch or Run Sloppy Batch 4x6 action
- Click on the Play (triangle) icon at the bottom of the Actions palette
- Read the instructions, then click on the Continue button
- Select a sloppy border from the list
- Click on the Open button
- Read instructions, then click on the Continue button
The Batch window will open - Select your image Source folder
- Select your image Destination folder
- Ensure these options are "checked"
-
• Suppress File Open Options Dialogs
-
• Suppress Color Profile Warnings
-
• Override Action "Save As" Commands
- Click on the OK button
Install the Kubota Textures action, brushes & scripts, and texture files to successfully run and apply the textures.
STEP 1 - Extract Files
- Open a Finder or File Explorer window
- Navigate to the downloaded Kubota Textures Earth.zip or Kubota Textures Industrial.zip file likely found in your Downloads folder
- Unzip/Extract if needed
Included files:-
• Kubota Texture runner.atn
-
• Kubota Texture Tools Installation Instructions.pdf
-
• Kubota Textures Industrial in Detail.pdf or Kubota Textures Earth in Detail.pdf
-
• Kubota Texture Brushes and Scripts
-
• Kubota Textures - Industrial folder or Kubota Textures - Earth folder
- Keep your Finder or File Explorer window open and continue to STEP 2
STEP 2 - Load the Brushes & Scripts Files into Photoshop
Photoshop CS2 - CC2022:- Close Photoshop
- Open a second Finder or File Explorer window
- Navigate to and open Photoshop’s Presets folder
-
• Mac: Applications > Adobe Photoshop (your version) > Presets
-
• Windows: C Drive > Program Files or Program Files (x86) > Adobe > Adobe Photoshop (your version) > Presets
- Place both Finder or File Explorer windows side-by-side
-
• Select the Kubota Texture Brushes & Scripts folder and move into Photoshop > Presets > Presets folder
-
• Select the Kubota Textures - Earthor folder and move into your Photoshop (your version) folder
- The brushes & scripts, and texture files are now loaded into Photoshop
- Keep your Finder or File Explorer window open and continue to STEP 3
STEP 3 - Load the Action File into Photoshop
Follow one of the methods below.Method 1:
- Double-click on the action file Kubota Texture runner.atn
- Photoshop will open
- Go to Window > Actions to open the Actions palette
- The action file is now loaded into Photoshop's Actions palette and can be found at the bottom of the list
- Keep this window open and continue to load the Brushes & Scripts and Textures files
Method 2:
- Open Photoshop
- Go to Window > Actions to open the Actions palette
- Click on the top right menu icon
- Select Load Actions... from the menu list
- Navigate to and open the Kubota Textures Earth or Kubota Textures Industrial folder
- Select the file Kubota Texture runner.atn
- Click on the Open/Load button.
- The action file is now loaded into Photoshop's Actions palette and can be found at the bottom of the list.
Apply Texture to an Image
- Open Photoshop
- Open an image you wish to enhance
- Go to File > Scripts > Kubota Texture Runner 15
- On the next window, navigate to the Kubota Texture Earth folder within your Photoshop folder
-
• Mac: Applications > Adobe Photoshop (your version)
-
• Windows: C Drive > Program Files or Program Files (x86) > Adobe > Adobe Photoshop (your version)
- Select the texture and click on Open
The script will place the texture over your image at the default opacity setting of 80% in Overlay mode. It will create a mask layer and select the proper brush so you can start painting away texture if desired.
Grow
A border is placed around your original image size increasing the image size.Keep
The original image size is reduced to allow room for the border, keeping the image size the same as before the border action was run.Group Layer
This layer is like a bucket of your image and border layers. You can drag this group layer onto an album design layout and as long as the Color Fill layer is turned off (no eyeball on the left), you will match the background of the page to the background of the border.Color Fill Layer
Double-click on the icon that looks like it has a white box with a see-saw below it. If you click in this area it will bring up your color picker and allow you to choose the color of the outside border. Remember you can play the Invert Border Color action to invert the colors. Turn off the left hand eyeball, then drag your group layer to an album layout to use a bordered image without the exterior frame.Get the most from your textures by following these few simple steps. Change the Texture Mode:
- Apply a texture.
- Search change in the search window.
- Select and apply one of the Change Texture Blend effects.
- Apply a texture.
- Search remove in the search window.
- Apply the Remove Texture Color effects.
- Apply a texture.
- Select the texture layer
- Increase or decrease the opacity.
Install AutoAlbum action files to successfully run and apply the templates.
STEP 1 - Extract Files:
- Open a Finder or File Explorer window
- Navigate to the downloaded Kubota AutoAlbum V3.zip likely found in your Downloads folder
- Unzip/Extract if needed
Included files:
-
• Kubota AutoAlbum V3.atn
-
• Kubota AutoAlbum Set Up.atn
-
• Kubota AutoAlbum V3 Installation Instructions.pdf
-
• Kubota AutoAlbum Template Library.pdf
- Keep your Finder or File Explorer window open and continue to STEP 2
STEP 2 - Load the Action Files into Photoshop
Follow one of the methods below.Method 1:
- Double-click on the Kubota AutoAlbum V3.atn file
- Double-click on the Kubota AutoAlbum Set Up.atn file
- Photoshop will launch/open
- Go to Window > Actions to open the Actions palette
- The action file is now loaded into Photoshop's Actions palette and can be found at the bottom of the list
- You are done and ready to design.
Method 2:
- Open Photoshop
- Go to Window > Actions to open the Actions palette
- Click on the top right menu icon
- Select Load Actions... from the menu list
- Navigate to and open the Kubota AutoAlbum V3 folder and select file Kubota AutoAlbum V3.atn li>Click on the top right menu icon
- Select Load Actions... from the menu list
- Navigate to and open the Kubota AutoAlbum V3 folder and select file Kubota AutoAlbum Set Up.atn
- Click on the Open/Load button.
- The action file is now loaded into Photoshop's Actions palette and can be found at the bottom of the list
- You are done and ready to design.
Template sizes available:
- Square: 10"x10"
The helper actions will easily resize them to: 12”x12”, 11”x11”, 8”x8”, 7”x7”, 6”x6”, or 5”x5”. - Square Panoramas: 10"x20"
The helper actions will easily resize them to: 12”x24”, 11”x22”, 8”x16”, 7”x14”, 6”x12”, or 5”x10”. - Rectangle: 11"x14" Vertical
Square [ S ]
Square Panorama [ SP ]
Rectangle Vertical [ RV ]
Every template name corresponds to the name of an Action. The name tells you the type of page, how many Horizontal images, and how many Vertical images are on the page.
Download the template library reference guide.
Customize some of the features about the look of your album layout by changing the Kubota AutoAlbum default preferences found in Photoshop's Actions palette.
To customize the AutoAlbum preferences:
- Create a layout using an AutoAlbum template action.
- Adjust AutoAlbum preferences as detailed below.
To customize the Keyline thickness and color:
- Click the arrow next to Keyline Preference.
- Double-click on the Set Layer Styles of current layer.
- Select preferred keyline thickness and color.
- Click OK
To customize the Color Overlay and Opacity:
- Click the arrow next to Screen image 50%.
- Double-click on the Set Layer Styles of current layer.
- Select preferred color overlay blend mode and opacity.
- Click OK
To customize the Keyline with Color Overlay and Opacity:
- Click the arrow next to 6 pt Keyline with Screen 50%.
- Double-click on the Set Layer Styles of current layer.
- Select preferred color overlay blend mode, opacity, and keyline thickness.
- Click OK
To customize the Background color:
- Click the arrow next to Background Color.
- Double-click on the Make Fill Layer.
- Select preferred color.
- Click OK
To customize the album page Resolution:
- Play the Action Set Resolution - Step 1 to create a new document.
- Click the arrow next to Set Resolution - Step 2.
- Double-click on the Image Size step.
- Uncheck the Resample Image checkbox.
- Enter new resolution.
- Click OK
- Close document created in step 1.
Before designing an album, your images should be:
- Retouched, if necessary.
- Color corrected.
- Enhanced as desired.
- Sharpened.
- We do not recommend that you re-size your images, AutoAlbum will do this for you. Keep them at their original size and resolution whenever possible.
- If cropping is necessary, crop all images to the same size to allow templates to properly resize them.
To create your album design:
- Select a layout from the Template Library book
- Open your Actions palette, select the corresponding layout number in the Kubota AutoAlbum Actions folder.
- Select the Action and click ‘Play’. After doing this, you may be prompted with messages before the Action can proceed. Read these messages carefully and respond accordingly.
- Select your images based on the orientation indicated by the Action and on the sample page. Each picture will be placed as a Smart Object in the same order as labeled in the Template Library.
- Save the resulting file as a .PSD (Photoshop Document) if you wish to preserve the image layers and do any final positioning adjustments (highly recommended).
- Save a copy of the file as a .TIF or .JPG for your lab.
Things to keep in mind
- SAVE a copy of your fully retouched/enhanced images BEFORE placing them in the album pages. AutoAlbum will place each image as a Smart Object. Therefore, it remains editable in the page layout. Refer to your Photoshop Help Files for more information on working with Smart Objects.
- Make sure the image you have selected is of the correct orientation as indicated by the prompts and in the Template Library book.
- Most of the album page designs use full frame images. If you wish them to be cropped differently, do so in Photoshop prior to placing the image in the layout. Cropped images will still work in AutoAlbum, but the layout will look slightly different than the design sample. Be sure to visually check the page before finalizing it and make any adjustments if necessary.
To edit an image already placed in a layout:
- Right-click on the image layer in the area to the right of the smart object icon.
- Select Edit Contents.
- Click OK.
- A new window will open where changes can be made.
- Flatten image when done editing.
- Go to File > Save.
To replace an image already placed in a layout:
- Right-click on the image layer in the area to the right of the smart object icon.
- Select Replace Contents.
- Navigate to and select new image of the same orientation.
- Click OK.