Kubota Market & DASHBOARD Support Center
KUBOTA MARKET & DASHBOARD SUPPORT CENTER
Kubota Market is a mecca of photo enhancing-tools for Photoshop which include actions, effects, borders, and textures. With Kubota Market and the Kubota Market DASHBOARD, you are able to automate photo editing and create beautiful images, videos, and designs.To update your profile information:
- Log into your Kubota Market account.
- Go to the My Profile tab.
- Click on Update next to the profile detail you wish to update.
- Enter new details.
- Click on the Submit button.
As of April 28, 2015, all Kubota DASHBOARDs for Photoshop require a monthly subscription with plans starting at $2.99.
All new subscribers receive a free 7-day trial to the Unlimited plan where you can access over 600 Kubota actions, borders, and textures prior to the start of your subscription.
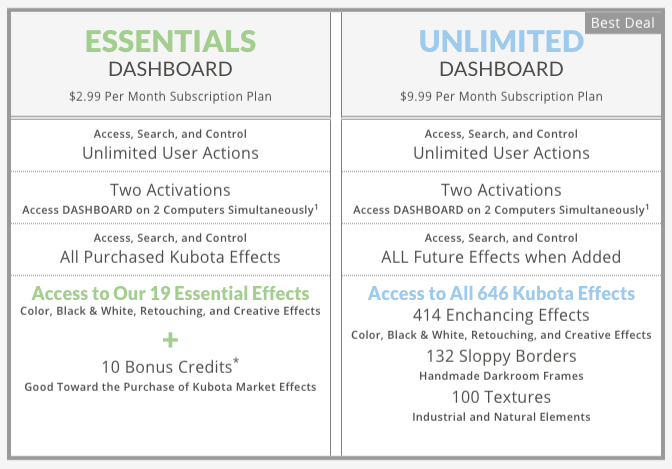
- If you do not wish to subscribe, contact Customer Support to request your purchased effects be sent to you to install directly into the Actions palette of any version of Photoshop.
Included with your Essentials subscription is access to 19 of our most popular effects.
-
Boosterizer
A great everyday effect for enhancing colors and contrast without being over-done. Gives a nice little boost!
-
BW Museum
A great classic version of black and white.
-
Color Luminizer Interactive
Use when you want to select a certain color range in your image and lighten or darken it interactively. For example, you could click on the face to lighten it up then click on the sky to darken. Works more naturally than Photoshop's default Hue brightness control.
-
Color Vibralizer Interactive
Use to interactively enhance certain color ranges, adding a natural vibrance without looking over-saturated. For example you could make blue skies bluer.
-
Custard Cream
Pour some custard cream on the image and shoot it through an antique camera viewfinder. Shake lightly, don't stir, and you have a softly washed image that's contrasty, yet soft and, well, creamy.
-
Digital Fill Flash
Use it to lighten key areas of your image without washing out the shadows or blowing highlights.
-
Group Everything
Group all the layers into a single layer set. Useful when you have many layers and it's getting confusing or messy.
-
Hint of color
Is it black & white? Or is it color? This leaves a wisp of color, just a hint, for a unique vintage look.
-
Image Transfer Edges
A white image transfer looking border. Be sure to crop your image first as the border will fit to whatever dimensions your image has.
-
Just Pop
Just a little snap and contrast without affecting color tone or saturation. If you want to boost and add vibrance to colors too, try Boosterizer.
-
Powder Soft
A nice overall softening with very little glow. Great for skin softening. Maintains contrast and clarity.
-
Reveal Shadow Detail
A very natural looking effect that opens up shadows and reveals hidden details. You apply it multiple times to increase the effect.
-
Rich Black and White
A very rich, subtly warm, black & white look that has snap and contrast. The toning is only in the shadows, maintaining clean highlight areas.
-
Simple Watermark
If you just want to place a watermark on your image with whatever text you're fond of, use this! It creates a subtle, but effective watermark in the lower right corner of the image. You will be asked for the text you want to use. Use on any size or resolution image.
-
Tone a Luscious Cocoa
A warm, cocoa scented, monochromatic effect that hints at sepia. Maintains original image tone and contrast.
-
Tone a Luscious Midnight
A cool, monochromatic effect like the evening sky. Maintains original image tone and contrast.
-
Tone a Luscious Rose
Slightly red, warm, and full of love. A monochromatic effect that maintains original image tone and contrast.
-
Vintage Faded
The subtle color palette of your favorite films. Do you remember film?
-
Vintage Warm
Faded and filled with photographic memories. It has a warm tint, like the paper has yellowed a bit in that shoebox in your attic.
To start a subscription:
- Log into your Kubota Market account.
- Go to the Manage Subscription tab.
- Click on Start Subscription under the Subscription section.
- Select a plan.
- Click on the Subscribe Now button.
- Enter credit card details.
- Click on the Subscribe button.
To update your credit card:
- Log into your Kubota Market account.
- Go to the Manage Subscription tab.
If your Account Status is Active:
- Click on the Update link under the Billing section.
- Enter new credit card details.
If your Account Status is Past Due:
- Click on the Update Payment Info link under the Subscription section.
- Enter new credit card details.
If your Account Status is Inactive:
- Click on the Update link under the Billing section.
- Enter new credit card details.
- Click on the Subscribe link under the Subscription section.
- Choose your plan and subscribe.
To change from Essentials to Unlimited or vice versa:
- Log into your Kubota Market account.
- Go to the Manage Subscription tab.
- Click on the Change Subscription link.
- Select your new plan.
- Click on the Update Now button.
- Your monthly fee will be prorated.
To load effects after changing your subscription plan:
- Click on the Settings icon found on the lower left side of the DASHBOARD.
- Click on Load Purchases.
To cancel your subscription:
- Log into your Kubota Market account.
- Go to the Manage Subscription tab.
- Click on the Cancel Subscription link under the Subscription section.
- Your DASHBOARD will remain active until the end of your billing period.
A subscription comes with two activations, which is the number of times you can be logged into the Kubota DASHBOARD. If you need to access more than two DASHBOARDs at the same time, additional subscriptions can be purchased. Contact Customer Support to purchase more.
To reset your activations:
- Contact Customer Support for assistance.
- All of our effects can be purchased individually, but they are also available in preset bundles, enabling you to buy a group of them and save money!
- Contact Customer Support for buying assistance.
Can I purchase effects if I don't have a Dashboard subscription?
Yes, you can purchase effects without a Dashboard subscription from the Kubota Image Tools website to receive a product download link. Note that if you purchase effects from the Kubota Market website, you will need to contact Customer Support to request purchased effect files be emailed to you.
The Kubota DASHBOARD is a Photoshop extension that organizes, searches, launches, and by golly it just makes Photoshop faster and more fun! It works with ANY action in Photoshop and all of the famous Kubota actions, borders, and textures. It also gives your own actions super powers, like one-step undo and paintability!
Kubota DASHBOARD 5 Overview from Kevin Kubota on Vimeo.
- Runs all Kubota actions, borders, and textures
- Exports actions for customization and batching
- Try an action before you buy
- Loads user actions
- Mark an action as a favorite by right-clicking on the name of the action
- Works on both Mac and Windows platforms
- Allows you to paint all paintable actions
- Command+Z will undo the action
- Double-click on the name of the action to make it run or click the Apply button
- Filter actions by category such as Favorite, Kubota Actions, Kubota Borders, Kubota Textures and User Actions
Requirements:
- Adobe - Photoshop CC 2021 or newer
- Internet access while in use.
- MAC - OS X 10.9 or higher
- WINDOWS - Microsoft Windows 7 or higher
Kubota DASHBOARD 5, Video 1 - Install & Setup from Kevin Kubota on Vimeo.
To download the DASHBOARD 5 installer file:
- Log into your Kubota Market account.
- Go to the Download DASHBOARD tab.
- Click on the DASHBOARD 5 button appropriate for your operating system.
- The installer file typically downloads into the Downloads folder.
To install DASHBOARD 5 on a MAC:
- Quit Photoshop.
- Locate the Kubota Market DASHBOARD 5 installer file.
- Right-click on the DASHBOARD installer file.
- Select Open.
- Select Open on the following window.
- Enter your Kubota Market account login credentials.
- Once installed, close installer window.
- Open Photoshop.
- Go to Window > Extensions > Kubota Market DASHBOARD.
To install DASHBOARD 5 in WINDOWS:
- Quit Photoshop.
- Double-click on the Kubota Market DASHBOARD 5 installer file.
- Enter your Kubota Market account login credentials.
- Once installed, close installer window.
- Open Photoshop.
- Go to Window > Extensions > Kubota Market DASHBOARD.
- If the DASHBOARD doesn't automatically open in Photoshop, go to Window > Extensions > Kubota Market DASHBOARD.
Extensions are not supported for Mac computers using the M1/M2 processor and Photoshop v.22.3 or later. However, the Kubota Market DASHBOARD can be used while running Photoshop 22.3 or later in Rosetta emulation mode. To learn more about Adobe Photoshop & Rosetta go HERE.
Learn more about the known differences and limitations of running Photoshop in native mode on computers using the Apple silicon M1 chip HERE.
Download the DASHBOARD 5 installer file:
- Log into your Kubota Market account.
- Go to the Download DASHBOARD tab.
- Click on the DASHBOARD 5 for Mac button.
- The installer file typically downloads into the Downloads folder.
Install DASHBOARD 5 on a Mac:
- Quit Photoshop.
- Locate the Kubota Market DASHBOARD 5 installer file.
- Right-click on the DASHBOARD installer file.
- Select Open.
- Select Open on the following window.
- Enter your Kubota Market account login credentials.
- Close the installer window when finished.
Set up Photoshop to "Open using Rosetta" by default.
- Open a Finder window.
- Navigate to your Applications folder.
- Locate and open your Photoshop folder labeled Adobe Photoshop 2021 or newer.
- Select the Photoshop application file labeled Adobe Photoshop 2021.app or newer.
- Click on Command + I on your keyboard to open the Get Info window.
- Check the Open using Rosetta box, then close the window.
- Double click on the application file to open it.

-
Alternatively, open Photoshop via your Creative Cloud app
- Open your Creative Cloud app.
- Go to the All Apps panel.
- Locate Photoshop CC2021 or newer.
- Click on the More Actions icon (three dots) to the right of the application.
- Select Open (Intel).

Open Photoshop and Dashboard 5
- Open Photoshop.
- In Photoshop, go to Window > Extensions (Legacy) > Kubota Market DASHBOARD.
- If the Dashboard login window appears, enter your Kubota Market DASHBOARD account email and password.

To uninstall DASHBOARD 5:
- Quit Photoshop.
- Locate the Kubota Market DASHBOARD 5 installer file.
- Double-click on the DASHBOARD installer file.
- Click on the Uninstall button.
- Close installer window.
Error - ...could not be loaded because it was not properly signed.
Why am I getting this message?That message appears when the link between Photoshop and Dashboard breaks due to a Photoshop or operating system update. There may also be something else specific to your system that could cause the break and this message may appear once again. Note that you do not need to uninstall Photoshop.
To relink Photoshop and Dashboard:
- Quit Photoshop
- Double-click on the Kubota Market DASHBOARD 5 installer file. Download again, if needed.
- Click Uninstall.
- Click Reinstall.
- Close the installer window
- Open Photoshop
- Go to Window > Extensions > Kubota Market DASHBOARD and open the DASHBOARD.
- You will need to follow the steps above if you receive this error message the next time you access Photoshop.
Error - ...can't be opened because it is from an unidentified developer.
Why am I getting this message?This message relates to your computer's security settings that are preventing the DASHBOARD from installing. You can allow the installation of the DASHBOARD through Privacy and Securities found in your computer Preferences window, or follow the steps below.
To grant permission to install:
- Locate the Kubota Market DASHBOARD 5 installer file.
- Right-click on the DASHBOARD installer file.
- Select Open.
- Select Open on the following window.
- Enter your Kubota Market account login credentials.
- Once installed, close installer window.
- Open Photoshop.
- Go to Window > Extensions > Kubota Market DASHBOARD.
Error - ...Activations Exceeded.
Why am I getting this message?You are trying to log into more than two DASHBOARDS at one time.
A subscription comes with two activations, which is the number of times you can be logged into the Kubota DASHBOARD. If you need to access more than two DASHBOARDs at the same time, additional subscriptions can be purchased. Contact Customer Support to purchase more.
To reset your activations:
Contact Customer Support
Error - ...the DASHBOARD opens but does not fully load.
If the DASHBOARD does not fully load, here are possible causes:- Not having a reliable and constant internet access
- A firewall is preventing the DASHBOARD from sending / receiving data.
- A security software is preventing the DASHBOARD from sending / receiving data.
Error - ...the DASHBOARD is installed but cannot see it.
Is your Photoshop's Home Screen enabled? If so, the DASHBOARD is hiding behind it.To disable Photoshop's Home Screen:
- Go to Photoshop > Preferences > General.
- Check the Disable the Home Screen check box.
- Click on the OK button.
- Workspace changes will take effect the next time you open Photoshop.
Error - ...Subscription Required.
Why am I getting this message?All Kubota DASHBOARDs for Photoshop require a monthly subscription with plans starting at $2.99. All new subscribers receive a free 7-day trial to the Unlimited plan where you can access over 600 Kubota actions, borders, and textures prior to the start of your subscription.
To start a subscription:
- Log into your Kubota Market account.
- Go to the Manage Subscription tab.
- Click on the Start Subscription link.
- Select a plan
- Enter credit card details.
- Click on the Start Subscription button.
Kubota Market DASHBOARD 5 - Getting Started from Kevin Kubota on Vimeo.
Quick Search
Search for an effect by name, photography type, style, etc.Apply Effects
Easily apply or paint on effects, and quickly undo.Did you know you can mark your most used effects as your favorites and make them even easier to find?
Favorite
Right-click, select Favorite'.
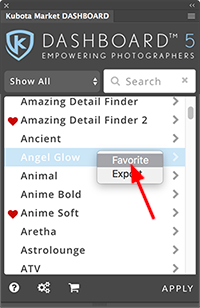
Right-click, select Favorite'.

Filter
Select Favorites' category.
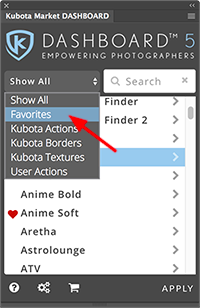
Select Favorites' category.

List
View only your favorite effects.
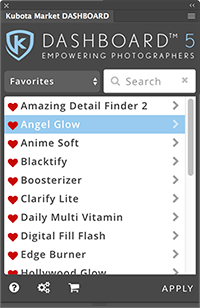
View only your favorite effects.

Batch Process Setup
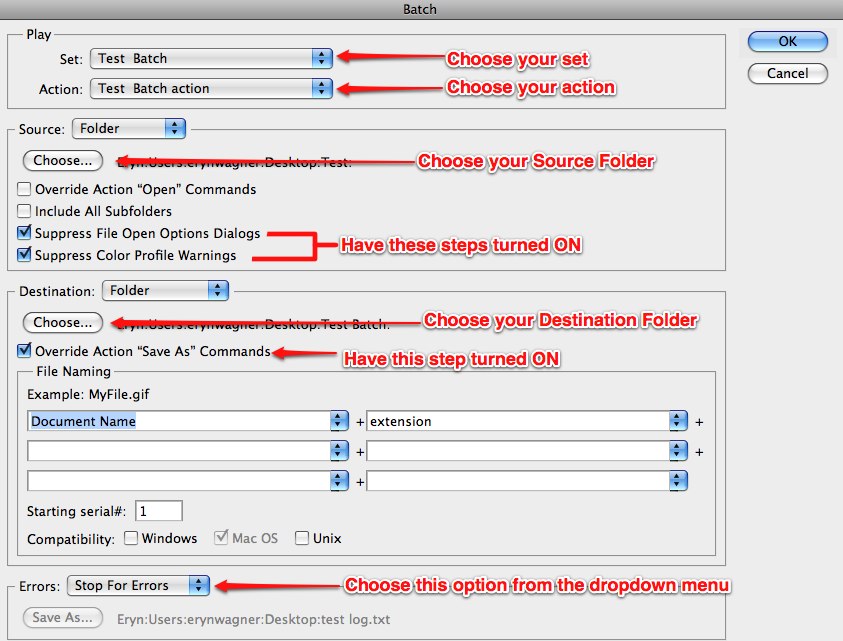
Before running the logo placer effect, you must first record the location of your logo.
To set up your logo:
- Open Photoshop.
- Go to Window > Actions to make the Actions palette visible.
- Locate and expand the set Kubota set-up Actions
- Select Open Logo.
- Click on the Record icon at the bottom of the Actions palette.
- Go to File > Open.
- Navigate to and select your logo file.
- Click on the Open button.
- Click on the Stop icon at the bottom of the Actions palette.
- Close the logo file.
- You can add / record as many logos as you want. Then enable or disable that logo by adding or removing the check mark to the left of the action Openstep.
The Eyes and Teeth effect creates facial enhancement layers masks for you. Just step through each layer, paint where desired on the corresponding layer mask, and then adjust the opacity of the layer as needed.
To make enhacements:
- Open an image.
- Play the Eyes and Teeth Enhance action.
- Go to Window > Layers to open the layers palette.
- Select the eyes brighten layer mask.
- Adjust the opacity of the layer if needed.
- Start painting over the whites of the eyes to brighten them up.
- Select the teeth brighten layer mask.
- Start painting over the teeth to brighten them up.
- Adjust the opacity of the layer if needed.
- Select the Desaturate eyes and teeth layer mask.
- Start painting over the red from the eyes and ellow from teeth.
- Adjust the opacity of the layer if needed.
- Select the darken shadows layer mask in the EyeLiner darken set.
- Paint around the eye lashes, the outside of the iris, and the eye brows to deepen the darker areas
- Play the Portrait setup step 1 action from your DASHBOARD and follow the instructions to make a rough selection around the area of your image you want to retouch using the lasso tool.
- On the base image, use the healing brush to remove blemishes that you want eliminated.
- Play the Portrait setup step 2 action. A new group of layers will be created on your layers palette.
To make adjustments on the Portrait setup step 2 layers:
- Retouch layer: Use the healing brush to minimize wrinkles, dark circles, etc.. Adjust the opacity of that layer to fade the effect without removing them completely.
-
Light skin powder layer: Use a soft-edged paint brush, sample skin color and paint areas to make them lighter.
Tip: to sample the skin color, Option > click for Mac and ALT > click for PC. It is best to continually resample skin so tones are smooth. -
Dark skin powder layer: Use a soft-edged paint brush, sample skin color and paint areas to make them darker.
Tip: to sample the skin color, Option > click for Mac and ALT > click for PC. - Eye whites layer mask: Use a soft-edged paint brush, paint with white to whiten.
- Color iris layer mask: Use a soft-edged paint brush, paint with white to saturate color.
- Desaturate eyes & teeth layer mask: Use a soft-edged paint brush, paint with white to clean bloodshot eyes and teeth stains.
- Eyeliner layer: Use a soft-edged paint brush, paint with black at about 25-50% opacity to burn dark areas of eyelashes and rim of iris.
To res up or res down:
- Crop your image first to the correct proportions without changing the resolution.
- Go to Image > Image Size.
- Check the Resample Image and Constrain Proportions options.
- Enter your desired height or width (the other dimension will automatically change to match).
- Enter your desired resolution. • Make a note of the resulting pixel dimensions at the top of the window. It will be the larger size to the left of the numbers in parentheses. This is you target image size.
- Close the dialog box WITHOUT clicking OK.
- set your info bar to show document size. This will help you to keep track of the file size as it grows.
- Play the desired res up action until you have gone one step past your target size.
- Undo your last step back one size.
- Go to Image > Image.
- Check the Resample Image and Constrain Proportions options.
- Type in the needed width or height and resolution.
- Click on the OK button.
- Use the Res Up 5 or Res Up 10 effect to enlarge 110% five or ten times.
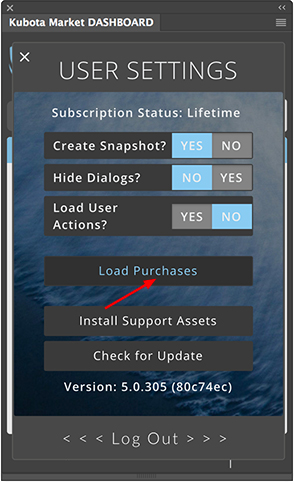
To load newly purchased effects or to load effects after changing your subscription plan:
- Click on the Settings icon found on the lower left side of the DASHBOARD.
- Click on the Load Purchases button.
Grow
A border is placed around your original image size increasing the image size.Keep
The original image size is reduced to allow room for the border, keeping the image size the same as before the border action was run.Group Layer
This layer is like a bucket of your image and border layers. You can drag this group layer onto an album design layout and as long as the Color Fill layer is turned off (no eyeball on the left), you will match the background of the page to the background of the border.Color Fill Layer
Double-click on the icon that looks like it has a white box with a see-saw below it. If you click in this area it will bring up your color picker and allow you to choose the color of the outside border. Remember you can play the Invert Border Color action to invert the colors. Turn off the left hand eyeball, then drag your group layer to an album layout to use a bordered image without the exterior frame.Get the most from your textures by following these few simple steps.
To change the texture mode:
- Apply a texture.
- Search change in the search window.
- Select and apply one of the Change Texture Blend effects.
To remove the texture color:
- Apply a texture.
- Search remove in the search window.
- Apply the Remove Texture Color effects.
To change the texture opacity:
- Apply a texture.
- Select the texture layer
- Increase or decrease the opacity.
Certain actions provide additional instructions in the form of a dialog box. Once you become familiar with how each effect you use works, you may want to hide the instructions, allowing for an even faster workflow. Note that turning the dialog box feature off hides them for all effects.
To show / hide the Dialog box:
- Click on the Settings icon (cog wheels) at the bottom of the DASHBOARD.
- Click on No next to the Hide Dialogs? question.
The Kubota enhancements applied from the DASHBOARD are created using Photoshop actions. Many of them use complex layering schemes to achieve a result. Therefore, a snapshot will be taken of your current image before any Kubota action runs. You can restore it to pre-application state if you don’t like the look. Simply click CMD / CTRL + Z or open your Photoshop History Palette and select the relevant before history state on the top of the palette.
This is also a good way to compare various effects. Simply run one, then click the before state, and run the next effect. Compare the results of both by clicking the after states of each effect.
To enable / disable Snapshots:
- Click on the Settings icon found on the lower left side of the DASHBOARD.
- Click on YES or NO next to the Create Snapshopt? question.
The Kubota DASHBOARD is a Photoshop extension that organizes, searches, launches, and by golly it just makes Photoshop faster and more fun! It works with ANY action in Photoshop and all of the famous Kubota actions, borders, and textures. It also gives your own actions super powers, like one-step undo and paintability!
- Runs all Kubota actions, borders, and textures
- Exports actions for customization and batching
- Try an action before you buy
- Loads user actions
- Mark an action as a favorite by right-clicking on the name of the action
- Works on both Mac and Windows platforms
- Allows you to paint all paintable actions
- Command+Z will undo the action
- Double-click on the name of the action to make it run or click the Apply button
- Filter actions by category such as Favorite, Kubota Actions, Kubota Borders, Kubota Textures and User Actions
Requirements:
- Internet access while in use.
- Adobe - Photoshop CS5 with Extension Manager CS5
- Adobe - Photoshop CS6 with Extension Manager CS6
- MAC - Mac OS X 10.5 or higher in 64-bit
- WINDOWS - Microsoft Windows XP or higher in 64-bit
To download the DASHBOARD 4 installer file:
- Log into your Kubota Market account.
- Go to the Download DASHBOARD tab.
- Click on the DASHBOARD 4 button to downlaod.
- The installer file typically downloads into the Downloads folder.
To install DASHBOARD 4 on a MAC / Windows:
- Quit Photoshop.
- Unzip / Extract the Kubota+Market+DASHBOARD+4.zip file.
- Double-click on the Kubota DASHBOARD 4 - Installer.zxp installer file. The Adobe Extension Manager application will automatically open.
- Accept the license agreement and proceed through installation warnings.

- Close the Extension Manager once the DASHBOARD has installed.

- Open Photoshop.
- Go to Window > Extensions > Kubota DASHBOARD.

- Log into the Kubota DASHBOARD with your Kubota Market account email and password.

To uninstall DASHBOARD 4:
- Log out of the DASHBOARD.
- Quit Photoshop.
- Open the Adobe Extensions Manager application.
- Click on Photoshop under the products list.
- Select the DASHBOARD under the extensions list.
- Click on the Remove button.
Error - ...Activations Exceeded.
Why am I getting this message?
You are trying to log into more than two DASHBOARDS at one time.
A subscription comes with two activations, which is the number of times you can be logged into the Kubota DASHBOARD. If you need to access more than two DASHBOARDs at the same time, additional subscriptions can be purchased. Contact Customer Support to purchase more.
To reset your activations:
- Log into your Kubota Market account.
- Go to the Manage Subscription tab.
- Click on the Reset Activations link.
Error - ...hangs while initializing.
The DASHBOARD may sometimes hang or gets stuck while loading, and resetting may be necessary.- Note: Completing these steps will remove the local store folder which stores any favorites or customizations you have set for your Actions.
To reset DASHBOARD 4 on a MAC:
- Quit Photoshop
- Open a Finder window
- Click the GO option from the top menu bar.
- With the GO menu open, press and hold the alt / option key on your keyboard to make the Library option appear.
- Select Library and follow this path in your Finder window:
Preferences > Stage Manager > Local Store - Delete the Local Store folder.
- Open Photoshop
- Go to Window > Extensions > Kubota DASHBOARD.
To reset DASHBOARD 4 in Windows:
- Quit Photoshop
- Open a File Explore window
- Navigate to:
C: > Users > Your User Name > AppData >Roaming > StageManager > LocalStore - Delete the Local Store folder.
- Open Photoshop
- Go to Window > Extensions > Kubota DASHBOARD.
WINDOWS USERS: *If you do not see the AppData folder:
- Go to your Control Panel > Folder Options.
- Click on the View tab.
- Turn on the Show Hidden Files and Folders option
- Click on the APPLY button.
- Click on the OK button.
- Follow the path above.
Error - ...You do not have permission.
This message relates to your account's installation privileges.To temporarily grant installation privileges on a MAC:
- Close Extension Manager CS5 / CS6.
- Open Terminal (/Applications / Utilities / Terminal).
- Copy / Paste the following into Terminal: sudo "/Applications/Adobe Extension Manager CS5/Adobe Extension Manager CS5.app/Contents/MacOS/Adobe Extension Manager CS5".
- Click on the Return key on your keyboard.
- Enter your computer's password.
- Click on the Return key on your keyboard.
- Extension Manager CS5 / CS6 will open with permissions.
- Proceed with the installation of the DASHBOARD.
To temporarily grant installation privileges in Windows:
- Close Extension Manager CS5 / CS6.
- Open a File Explorer window.
- Navigate to C://Program Files or Program Files (x86) / Adobe / Adobe Extension Manager / Adobe Extension Manager CSX.exe.
- Select Adobe Extension Manager CS5 or Adobe Extension Manager CS6.exe file, and right-click.
- Select Run as Administrator.
- Click on the Return key on your keyboard.
- Extension Manager CS5 / CS6 will open with permissions.
- Proceed with the installation of the DASHBOARD.
Error - ...Command 'make', 'select', 'invert'.
The DASHBOARD may sometimes hang or gets stuck while loading, and resetting may be necessary.Why am I getting the 'Command make' error?
- Have you created a new layer that an action would have trouble running from (e.g. text, curve, etc)?
- Are the images in 8 bit or 16 bit mode? Many Photoshop filters and adjustments will not work while your image is in 16 bit mode. You can change your mode from Image > Mode.
Why am I getting the 'Command select' error?
It is possible the tool preset files are not currently available.
To reload the tool presets:
- Click on the DASHBOARD menu icon at the top right corner of the DASHBOARD.
- Select Settings.
- Click on the Reload Tool Presets. button.
Why am I getting the 'Command invert' error?
It is possible the default setting was changed.
To reset the Mask Layer setting:
- Go to Window > Adjustments.
- Click on the Adjustment window menu icon at the top right corner
- Select Add Mask by Default option.
- Play the effect.
Error - ...Paste profile mismatch.
All of our textures are sRGB color space. If you are working in a color space other than sRGB, you will receive a Paste Profile Mismatch message, and you may convert the texture file to match your working color space.Error - ...Invalid signature.
An update to the Extension Manager application may be required.To update the Extension Mananger application:
- Visit Adobe's Extension Manager update page HERE.
Send a Support Ticket
If you are having trouble with DASHBOARD 4, send a support ticket detailing all issues for further review.To send a support ticket:
- Select Submit Support Ticket
- Enter as many details as possible under the Description section.
- Click on the Submit button.
- Look for a response from Customer Support within one business day.
Did you know you can mark your most used effects as your favorites and make them even easier to find?
Favorite
Right-click, select Favorite.
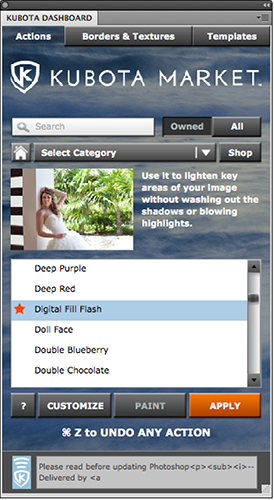
Right-click, select Favorite.

Filter
Select Favorites category.
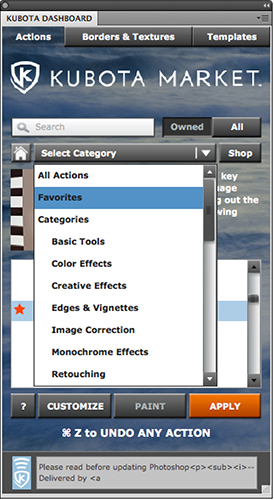
Select Favorites category.

List
View only your favorite effects.
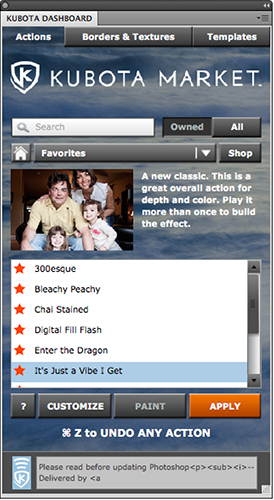
View only your favorite effects.

The DASHBOARD allows you to quickly search and run your own actions too. All of the actions in your Photoshop actions palette will be automatically loaded into your DASHBOARD upon login.
View User Actions Only
FilterSelect User Actions from the drop down menu.
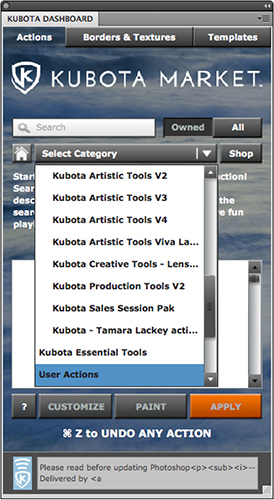
Remove / Reload User Actions
To remove or reload User Actions:- Click on the DASHBOARD menu icon at the top right corner of the DASHBOARD.
- Select Settings.
- Check or uncheck the Load user actions into dashboard check box.
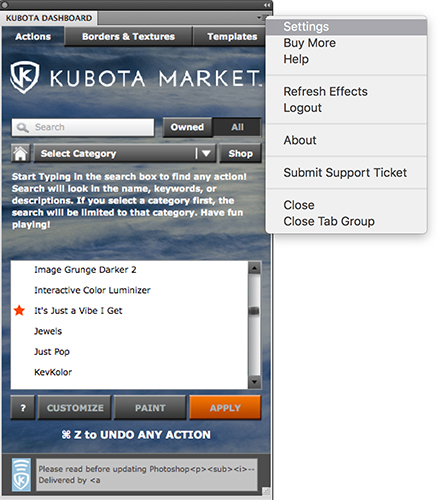
Bonus Tips:
- If you do not want an indiviual User Action or action set to load into your DASHBOARD, add a tilde character in front of the action name or action set name, i.e. ~My Test Action.
- Remember to turn the Load User Action feature off, then on whenever changes to the actions on the Actions paletter are made.
Creating a Custom Action from a Kubota DASHBOARD Effect from Kevin Kubota on Vimeo.
Batch Processing Images with the Kubota DASHBOARD from Kevin Kubota on Vimeo.
Batch Process Setup

- We do not recommend running these effects through the image processor in Bridge, as many of them will not run correctly.
Before running the logo placer effect, you must first record the location of your logo.
To set up your logo:
- Open Photoshop.
- Go to Window > Actions to make the Actions palette visible.
- Locate and expand the set Kubota set-up Actions
- Select Open Logo.
- Click on the Record icon at the bottom of the Actions palette.
- Go to File > Open.
- Navigate to and select your logo file.
- Click on the Open button.
- Click on the Stop icon at the bottom of the Actions palette.
- Close the logo file.
- You can add / record as many logos as you want. Then enable or disable that logo by adding or removing the check mark to the left of the action Openstep.
The Eyes and Teeth effect creates facial enhancement layers masks for you. Just step through each layer, paint where desired on the corresponding layer mask, and then adjust the opacity of the layer as needed.
To make enhacements:
- Open an image.
- Play the Eyes and Teeth Enhance action.
- Go to Window > Layers to open the layers palette.
- Select the eyes brighten layer mask.
- Adjust the opacity of the layer if needed.
- Start painting over the whites of the eyes to brighten them up.
- Select the teeth brighten layer mask.
- Start painting over the teeth to brighten them up.
- Adjust the opacity of the layer if needed.
- Select the Desaturate eyes and teeth layer mask.
- Start painting over the red from the eyes and ellow from teeth.
- Adjust the opacity of the layer if needed.
- Select the darken shadows layer mask in the EyeLiner darken set.
- Paint around the eye lashes, the outside of the iris, and the eye brows to deepen the darker areas
- Play the Portrait setup step 1 action from your DASHBOARD and follow the instructions to make a rough selection around the area of your image you want to retouch using the lasso tool.
- On the base image, use the healing brush to remove blemishes that you want eliminated.
- Play the Portrait setup step 2 action. A new group of layers will be created on your layers palette.
To make adjustments on the Portrait setup step 2 layers:
- Retouch layer: Use the healing brush to minimize wrinkles, dark circles, etc.. Adjust the opacity of that layer to fade the effect without removing them completely.
-
Light skin powder layer: Use a soft-edged paint brush, sample skin color and paint areas to make them lighter.
Tip: to sample the skin color, Option > click for Mac and ALT > click for PC. It is best to continually resample skin so tones are smooth. -
Dark skin powder layer: Use a soft-edged paint brush, sample skin color and paint areas to make them darker.
Tip: to sample the skin color, Option > click for Mac and ALT > click for PC. - Eye whites layer mask: Use a soft-edged paint brush, paint with white to whiten.
- Color iris layer mask: Use a soft-edged paint brush, paint with white to saturate color.
- Desaturate eyes & teeth layer mask: Use a soft-edged paint brush, paint with white to clean bloodshot eyes and teeth stains.
- Eyeliner layer: Use a soft-edged paint brush, paint with black at about 25-50% opacity to burn dark areas of eyelashes and rim of iris.
To res up or res down:
- Crop your image first to the correct proportions without changing the resolution.
- Go to Image > Image Size.
- Check the Resample Image and Constrain Proportions options.
- Enter your desired height or width (the other dimension will automatically change to match).
- Enter your desired resolution. • Make a note of the resulting pixel dimensions at the top of the window. It will be the larger size to the left of the numbers in parentheses. This is you target image size.
- Close the dialog box WITHOUT clicking OK.
- set your info bar to show document size. This will help you to keep track of the file size as it grows.
- Play the desired res up action until you have gone one step past your target size.
- Undo your last step back one size.
- Go to Image > Image.
- Check the Resample Image and Constrain Proportions options.
- Type in the needed width or height and resolution.
- Click on the OK button.
- Use the Res Up 5 or Res Up 10 effect to enlarge 110% five or ten times.
To load newly purchased effects or to load effects after changing your subscription plan:
- Click on the DASHBOARD menu icon at the top right corner of the DASHBOARD.
- Select Load Purchases or Refresh Effects
Grow
A border is placed around your original image size increasing the image size.Keep
The original image size is reduced to allow room for the border, keeping the image size the same as before the border action was run.Group Layer
This layer is like a bucket of your image and border layers. You can drag this group layer onto an album design layout and as long as the Color Fill layer is turned off (no eyeball on the left), you will match the background of the page to the background of the border.Color Fill Layer
Double-click on the icon that looks like it has a white box with a see-saw below it. If you click in this area it will bring up your color picker and allow you to choose the color of the outside border. Remember you can play the Invert Border Color action to invert the colors. Turn off the left hand eyeball, then drag your group layer to an album layout to use a bordered image without the exterior frame.Get the most from your textures by following these few simple steps.
To change the texture mode:
- Apply a texture.
- Search change in the search window.
- Select and apply one of the Change Texture Blend effects.
To remove the texture color:
- Apply a texture.
- Search remove in the search window.
- Apply the Remove Texture Color effects.
To change the texture opacity:
- Apply a texture.
- Select the texture layer
- Increase or decrease the opacity.
Certain actions provide additional instructions in the form of a dialog box. Once you become familiar with how each effect you use works, you may want to hide the instructions, allowing for an even faster workflow. Note that turning the dialog box feature off hides them for all effects.
To show / hide the Dialog box:
- Click on the DASHBOARD menu icon at the top right corner of the DASHBOARD.
- Select Settings.
- Add a check to the Supress dialogs box.
The Kubota enhancements applied from the DASHBOARD are created using Photoshop actions. Many of them use complex layering schemes to achieve a result. Therefore, a snapshot will be taken of your current image before any Kubota action runs. You can restore it to pre-application state if you don’t like the look. Simply click CMD / CTRL + Z or open your Photoshop History Palette and select the relevant before'’ history state on the top of the palette.
This is also a good way to compare various effects. Simply run one, then click the before state, and run the next effect. Compare the results of both by clicking the after states of each effect.
Due to changing technology and software, we are unfortunately no longer able to offer and support DASHBOARD 3. We have developed DASHBOARD 4 (for Photoshop CS5 and CS6) and DASHBOARD 5 (for Photoshop CC 2021) as replacements for DASHBOARD 3, and are available for a nominal subscription fee.
A newly released Unlimited subscription plan gives users access to over 600 Photoshop effects via the easy-to-use DASHBOARD 4 and 5.
To uninstall all DASHBOARD 3s on a MAC:
- Quit Photoshop.
- Go to Applications > Adobe Photoshop (your version) Delete all Kubota Dashboard 3 files.
- Go to Applications > Adobe Photoshop (your version) > Plugins
- Delete all Kubota Dashboard 3 files.
- Go to Applications.
- Delete the Kubota Dashboard 3 folder.
- Delete the Kubota AutoAlbum V3, if present.
- Go to Hard Drive > Users > Shared
- Delete the Kubota Image Tools folder
To uninstall all DASHBOARD 3s in Windows:
- Quit Photoshop.
- Go to Control Panel > Add / Remove Programs
- Delete all Kubota Dashboard files of your purchased products.
- Go to C:Drive > Program Files > Adobe > Adobe Photoshop (your version) > Plug-ins Delete all Kubota Dashboard 3 files.
AutoAlbum Users:
If you are upgrading to DASHBOARD 5, contact Customer Support for instructions on how to access AutoAlbum.
To install DASHBOARD 4 go HERE:
To install DASHBOARD 5 go HERE:
Install AutoAlbum action files to successfully run and apply the templates from the DASHBOARD.
STEP 1 - Extract Files:
- Open a Finder or File Explorer window
- Navigate to the downloaded Kubota AutoAlbum V3.zip likely found in your Downloads folder
- Unzip/Extract if needed
Included files:
-
• Kubota AutoAlbum V3.atn
-
• Kubota AutoAlbum Set Up.atn
-
• Kubota AutoAlbum V3 Installation Instructions.pdf
-
• Kubota AutoAlbum Template Library.pdf
- Keep your Finder or File Explorer window open and continue to STEP 2
STEP 2 - Load the Action Files into Photoshop
Follow one of the methods below.Method 1:
- Double-click on the Kubota AutoAlbum V3.atn file
- Double-click on the Kubota AutoAlbum Set Up.atn file
- Photoshop will launch/open
- Go to Window > Actions to open the Actions palette
- The action file is now loaded into Photoshop's Actions palette and can be found at the bottom of the list
-
You are done and ready to edit.
- Open Photoshop
- Go to Window > Actions to open the Actions palette
- Click on the top right menu icon
- Select Load Actions... from the menu list
- Navigate to and open the Kubota AutoAlbum V3 folder and select file Kubota AutoAlbum V3.atn li>Click on the top right menu icon
- Select Load Actions... from the menu list
- Navigate to and open the Kubota AutoAlbum V3 folder and select file Kubota AutoAlbum Set Up.atn
- Click on the Open/Load button.
- The action file is now loaded into Photoshop's Actions palette and can be found at the bottom of the list
STEP 3 - Load templates into the DASHBOARD
To load the templates into the DASHBOARD:Template sizes available:
-
Square: 10"x10"
The helper actions will easily resize them to: 12”x12”, 11”x11”, 8”x8”, 7”x7”, 6”x6”, or 5”x5”. -
Square Panoramas: 10"x20"
The helper actions will easily resize them to: 12”x24”, 11”x22”, 8”x16”, 7”x14”, 6”x12”, or 5”x10”. - Rectangle: 11"x14" Vertical
Square [ S ]
Square Panorama [ SP ]
Rectangle Vertical [ RV ]
Every template name corresponds to the name of an Action. The name tells you the type of page, how many Horizontal images, and how many Vertical images are on the page.
Download the template library.
Customize some of the features about the look of your album layout by changing the Kubota AutoAlbum default preferences found in Photoshop's Actions palette.
To customize the AutoAlbum preferences:
- Create a layout using an AutoAlbum template action.
- Adjust AutoAlbum preferences as detailed below.
To customize the Keyline thickness and color:
- Click the arrow next to Keyline Preference.
- Double-click on the Set Layer Styles of current layer.
- Select preferred keyline thickness and color.
- Click OK
To customize the Color Overlay and Opacity:
- Click the arrow next to Screen image 50%.
- Double-click on the Set Layer Styles of current layer.
- Select preferred color overlay blend mode and opacity.
- Click OK
To customize the Keyline with Color Overlay and Opacity:
- Click the arrow next to 6 pt Keyline with Screen 50%.
- Double-click on the Set Layer Styles of current layer.
- Select preferred color overlay blend mode, opacity, and keyline thickness.
- Click OK
To customize the Background color:
- Click the arrow next to Background Color.
- Double-click on the Make Fill Layer.
- Select preferred color.
- Click OK
To customize the album page Resolution:
- Play the Action Set Resolution - Step 1 to create a new document.
- Click the arrow next to Set Resolution - Step 2.
- Double-click on the Image Size step.
- Uncheck the Resample Image checkbox.
- Enter new resolution.
- Click OK
- Close document created in step 1.
Before designing an album, your images should be:
- Retouched, if necessary.
- Color corrected.
- Enhanced as desired.
- Sharpened.
- We do not recommend that you re-size your images, AutoAlbum will do this for you. Keep them at their original size and resolution whenever possible.
- If cropping is necessary, crop all images to the same size to allow templates to properly resize them.
To create your album design:
- Select a layout from the Template Library book
- Open your Actions palette, select the corresponding layout number in the Kubota AutoAlbum Actions folder.
- Select the Action and click ‘Play’. After doing this, you may be prompted with messages before the Action can proceed. Read these messages carefully and respond accordingly.
- Select your images based on the orientation indicated by the Action and on the sample page. Each picture will be placed as a Smart Object in the same order as labeled in the Template Library.
- Save the resulting file as a .PSD (Photoshop Document) if you wish to preserve the image layers and do any final positioning adjustments (highly recommended).
- Save a copy of the file as a .TIF or .JPG for your lab.
Things to keep in mind
- SAVE a copy of your fully retouched/enhanced images BEFORE placing them in the album pages. AutoAlbum will place each image as a Smart Object. Therefore, it remains editable in the page layout. Refer to your Photoshop Help Files for more information on working with Smart Objects.
- Make sure the image you have selected is of the correct orientation as indicated by the prompts and in the Template Library book.
- Most of the album page designs use full frame images. If you wish them to be cropped differently, do so in Photoshop prior to placing the image in the layout. Cropped images will still work in AutoAlbum, but the layout will look slightly different than the design sample. Be sure to visually check the page before finalizing it and make any adjustments if necessary.
To edit an image already placed in a layout:
- Right-click on the image layer in the area to the right of the smart object icon.
- Select Edit Contents.
- Click OK.
- A new window will open where changes can be made.
- Flatten image when done editing.
- Go to File > Save.
To replace an image already placed in a layout:
- Right-click on the image layer in the area to the right of the smart object icon.
- Select Replace Contents.
- Navigate to and select new image of the same orientation.
- Click OK.


